Monday, July 31, 2017

Tree Progress

I've been making some progress with my tree project.  I'm quite pleased with the leaves, but as suspected getting the shading right on the branches and trunk is difficult.  I've tried to fill based on the shading in the photo, but it almost doesn't work if that makes any sense.  Its not just colouring in.  What I've done is that once I've 'coloured in' based on the photo, I've gone back and put in some of the darker thread in between the lighter colours.  Not extra split stitches, but just some straight stitches in between the rows of split stitches.  This (to me) seems to have made the lighter areas not so overpowering (I hope).  Here's a close up of what I mean.  You can just see a few of the darker threads in amongst the lighter areas.  


I think being able to draw/paint would definitely help with a project like this.  But you gotta give it a go, right?


TAST - Crested Chain

I'm running behind on this weeks TAST stitch - Crested Chain.  I thought it would make a great set of dinosaur 'spikes'.  Not a chicken I know.  But I was going to do a chicken in a dinosaur costume.  But I couldn't get the image to look right.  Then I was going to do chicks with Punk hair, but when I tried it that looked awful, so now I've changed it to a banner, but I'm running behind.  So you'll have to wait and see that one :-)

Wednesday, July 26, 2017

TAST - Crested Chain Stitch


Hmm...not sure what to do with this weeks stitch - Crested Chain.  It looks quite similar to Bonnet Stitch, of which I was not a fan.  If its like bonnet stitch it's going to look best with a thicker thread and probably good tension.  And I use 2 strands of DMC floss and have terrible tension.  Oh well, I'll just have to find a great chicken picture to detract from the stitch itself haha.

The tutorial on Pintangle is here if you want to have a go.


The Tree

I've made a start on the tree.  Its started off not too bad.  I can see now why Elza sometimes uses regular sewing machine thread, even 1 strand of DMC thread is quite thick for the wee branches.  While I aim to one day be able to needlepaint like Elza and Trish Burr and other amazing artists like them, I don't think the smoothness of their technique would work for the leaves of this tree (thankfully) so while technically I've used the same technique I've tried to keep some texture in the stitches to replicate the leaves.

For the bark/thicker branches I'm using my tried and true favourite split stitch and for the smaller branches good old back stitch.  I quite like the look of the split stitch for the bark, it works.  But as I said the single strand of DMC does seem a bit thick for the smaller back stitch.

For the next project Tip #1 - Try out some sewing machine thread compared to a single strand of DMC.  Ahead of time of course so you can colour match.

The biggest hurdle I think for this project will be the shading.  I'm not an artist by any stretch of the imagination so shading is a completely foreign concept.  I've again picked a spread of colours with DMC doing the work for me.  So I'll just be doing my best using those for the shading and hoping the end result works.  It's all about learning new things so we'll just see where we end up.  And if nothing else I imagine its practice, practice, practice.

Oh! as for the printable fabric.  I'm quite impressed with the print quality.  Although its definitely noisier to stitch than regular calico.  You can definitely hear the thread going through the fabric.  Not sure if thats the ink or just the fabric itself.  I can't feel any difference between the printed area and the non printed, so I guess it must be the fabric.  Must remember to have a wee stitch on the outer edge and have a listen.  (not that its weird to be listening to your stitching at all, yeah right!)

Right I'll leave it there, get Miss P into bed and get sewing!


Saturday, July 22, 2017

Encrusted Calico - Woohoo it's finished!

Yep, done and dusted.  As I think I mentioned I spent a bit of time 'rounding' it up as the outer edge was looking a big weird.  But of course now it possibly looks like it should be a circle and its not.  And of course if you give that thought any credence I could be here for the rest of the year and to be honest I just don't have the fabric around the edge to do that.  I've already well and truly blown past my 10cm x 10cm border (4" x 4").

I'm pleased with the end result and to keep Hubby happy I'll find a frame and put it on the wall somewhere (behind a door or something haha).  I might type up a quick how-to at some point, put all my lessons learnt in one place, in case someone else like me is poking around the net looking for the same thing.  But I think before I do that I might do another one, not as big and actually covering a pebble/small stone seeing thats what started me down this route in the first place.  Will see what else there is to learn about actually covering a pebble, I did find some comments somewhere about the challenges of dealing with wrinkles in the fabric caused by both the lumpy bits and of course the wrapping around the pebble, so that'll be interesting.

Anyway, here is the finished result.  Its another grey, wet day here so you'll have to excuse the lighting, I did my best.


What Next?

So whats next?  Well I don't have a pebble just yet so thats out and I can't have nothing to do.  That'll just drive me potty.  I have had a fascination with Van Goghs Starry Night for quite a while, reckon it'd look great in thread and turns out someone beat me to it (not surprising).  But that doesn't mean its off the to-do list, just not right now.  

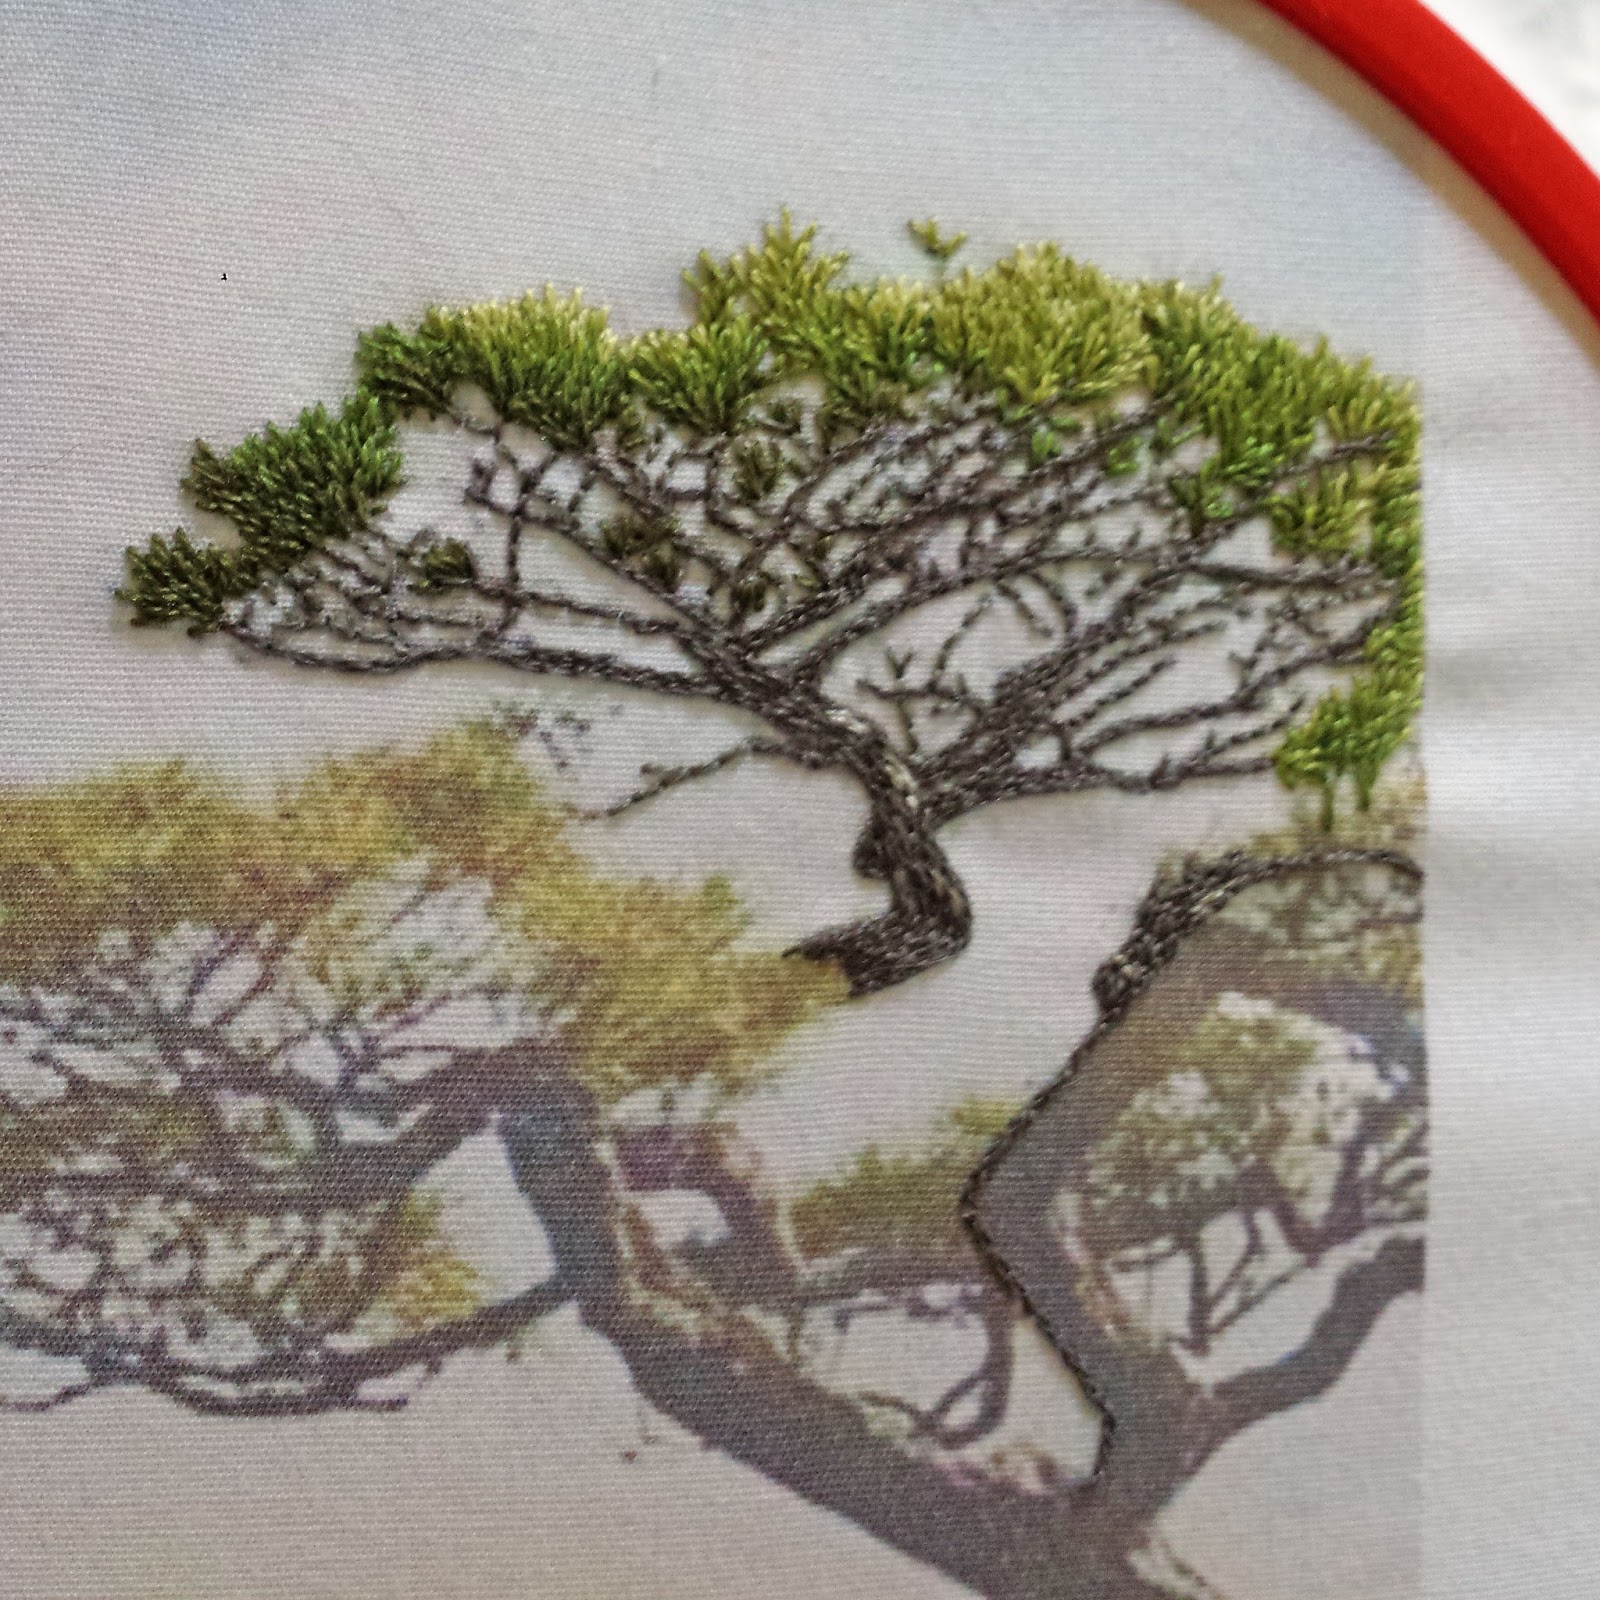
There is a lady in South Africa called Elza, not sure what her last name is.  Elza prints photos onto fabric and then embroiders the details.  For someone like me who can't paint, dye etc this sounds like a great idea.  So I think thats what I'm going to do next.  I've found my photo, I've printed it onto some 'ready to print' fabric which I haven't used before.  But we'll see how we go, its printed at 9cm wide by about 18 cm tall (3 1/2" x 7").  Here's the photo below (I have a fascination with trees believe it or not, not actually chickens haha).  Anyway based on the way Elza does her embroidery I will embroider the foreground tree, flowers, rocks etc but the print of the background stays untouched.  So you get to keep the depth of the photo I guess.  What do I know? Nothing thats what, but I'm going to give it a go.

Elza seems to do flowers and birds and they're A-M-A-Z-I-N-G.  She doesn't sell patterns or do classes but she does share advice etc from her Facebook page.  If you want to check her out, here's her Facebook page.  Elza'z Embroidery


TAST - Closed Herringbone

I've also finished Chicken Little # 92 - Closed Herringbone.  I've had this chicken image in my folder for a while, not particularly keen on it, but figured it might come in handy for a 'filling' type stitch at some point.  Turns out it was perfect for Closed Herringbone - yay!


Tuesday, July 18, 2017

Encrusted Calico - Progress

Well I'm nearly there.  Although I'm not too happy with the shape, I think I might try and round it up a bit.  The initial plan was to kind of have a bit of a wavy, more random edge but the sides haven't worked out that way.  

Oh well, a few more days stitching will save me having to worry about what my next project will be for a bit longer.  That and what I'm going to do once TAST is finished - gulp! 

Hubby is suggesting rather strongly that I frame this one when its done.  Whats wrong with a box full of embroidery - thats what I'd like to know.  But yes I might frame this one and I have my first stump work piece that needs a frame too.


You may or may not have noticed that the other bone button (from the bottom right) is missing.  Once I'd shifted a couple of bits around I figured I might as well get rid of that one as well.  Hey! don't judge its my project and I can do what I want 😝

TAST - Closed Herringbone

Still a few more weeks of TAST to go.  This weeks stitch is Closed Herringbone, the tutorial on Pintangle is here and as per usual I've borrowed a picture from the tutorial.  Hmmmm, it kind of lends itself to long tail feathers or maybe a thatched roof.  Although its highly unlikely I will be able to get it THAT neat and even.  Will have to put my thinking cap on.  

Thats it for now.


Saturday, July 15, 2017

TAST - linked double chain

I was starting to think we wouldn't see the sun again for a short while there.  But its back - yay!  And as promised here is Chicken Little #91 - linked double chain.


Thursday, July 13, 2017

TAST - linked double chain

The weather is totally awful here today.   A big snow storm affecting the whole country, we're only a small country but still.  Not a lot of snow in our area, but its on the hills and we've definitely got the wind and rain and its terribly cold.  And lucky for me I didn't HAVE to go into work so I didn't which means I've cracked off this weeks TAST stitch today - linked double chain.  The Pintangle tutorial is here , with a picture from the tutorial below.


When I first saw this I thought how the heck am I going to chicken-ify that?!?  But luckily it wasn't so hard.  I might sound like I'm being a bit of a tease saying I've done the stitch this week and not showing my version of it.  But its still drying and its so dark here today I don't think I stand a chance of photographing it.  So you'll just have to wait 😴

Progress on the Encrusted Calico

I have made some progress over the last few days on the encrusted piece.  The spiral trellis that I was going to practice a bit more before adding, well I added it, even though I didn't practice it.  I'm sure any good embroiderer will look at it and go 'yep you should've practiced it a bit more'.  But I'm quite pleased with it considering it's only the third time I've tried it.

Oh! I have another confession to make I did actually pick my two layers apart for a bit of modification.  I had a small curtain ring with a bead inside it and as I've worked on the stitching the bead had kind of gotten lopsided.  So I unpicked the two layers around that to remove the bead.  It meant that I had to unpick another bit to get to it, so while I was there I removed button that I had underneath a plastic 'thing' (I'm really not sure what it is, hubby bought it up from the garage for me).


I did notice the other day on the one piece of info I did find about encrusted calico that they suggested you add the bits between the layers as you go, where as another site had said to make the sandwich first.  That may've been more helpful to read at the start rather than over half way through.  Oh well, next time.  😆

So that must be a new learning right?

Learning Number 7:
I think there could be some merit in not sewing all your bits between the layers right at the start.  Because if like me something doesn't work, or shifts in the middle of stitching it can be a bit of a pain to undo.

Learning Number 8:
This one is totally obvious to most but actually in practice not always easy to do.  When working on your piece don't hold onto the fabric where you have already stitched.  Thats goes for any embroidery really.  But I've noticed that the bone button stitching looks a bit rubbed.  The thing caused me no amount of angst to start with trying to figure out how to cover it over and now the threads look a bit worn.  I'm not sure if I've been holding on to it while stitching or its just fluffed up a bit as my hand has gone back and forth around it.  I guess the other option would be to do the 'filling in' first and then the actual 'accent' bits at the end.  But then the filling would drive the accent bits rather than the other way around so thats not a great idea either.  Just be careful with handling your stitching alright?

Um what else?  Oh the curtain ring.  So once I had removed the bead I decided to fairly loosely button hole around the curtain ring and fill it in with just a single coloured group of French knots.

Its actually quite cool to look at the 'before' shot and where I'm at now.


Monday, July 10, 2017

TAST - Woven Trellis

Whoop! Whoop!  Chicken Little Number Ninety - yep Nine OHHH.... Its crazy I know but 90 little chickens 😝


If you want to check them all out, the link to my online album is here.  

The next TAST stitch will be up tomorrow :-)


Saturday, July 8, 2017

Chicken Little Number 89 - Italian Border

Ok so in order to catch up to 89 stitches for the current round of TAST I've done an extra stitch this week - Italian Border.  Still from the list at Pintangle but not in the current TAST list.  Sharons tutorial is here.

I'm really pleased with how this wee guy came out.  Italian border is a variation of Fly Stitch and when I was wondering what to do with it and scrolling through all my chicken images, I wondered whether it'd work one of top of the other and well I reckon it works pretty well as a grass skirt!


TAST - Woven Trellis

This weeks TAST stitch is Woven Trellis, the tutorial is found here.  I've have a plan for it, but haven't started it yet.  Yes I know I better get moving, but I still have a couple of days to get it done.
Here's a pic of the stitch from Pintangle.


Encrusted Calico

Miss P has been sick this week which isn't good but it has allowed me some extra sewing time.  So I've made some good progress with this.  I was a bit worried about the rather big lump of rubber (bottom right) and what I was going to do with that, but after doing some Picots further up, I figured there wasn't any reason why I couldn't use those to cover something.  I'm sure there is a proper name for it, but I don't know what it is. 😊

You know how when you have these 'great' ideas and you launch forth and find that while they look OK they don't fit quite right, or one is way thinner/longer/wonkier than the others?  Well that didn't happen.  They fitted just right, they're all of a pretty even size, I didn't catch one with my needle or anything!  I thought I'd just run a darker colour either side of each woven bit up to the centre just to break the large expanse of the same colour and that looked great too.  Topped it off with a few French knots to fill in the centre in the same darker colour and voila!  I'm so pleased with it.  I'll try and get a closer picture when its daylight.


Weirdly while the TAST stitch this week is Woven Trellis, from a completely different website I came across Spiral Trellis stitch.  The two stitches, don't really bear a lot of resemblance to each other, but once I get another one or two done as practice I'm going to use that for the last of the 3 same shaped 'bumps' on the left there. (just by my thumb).

Anyway I'm rambling, thanks for visiting 😁

Monday, July 3, 2017

TAST - Wrapped Coral

So after a bit of a rough start Chicken Little 88 is done.  I was originally going to give the chicken hair and use the Wrapped Coral as plaits, but once I started it I hated it.  So I undid it.  Second try I decided I'd go with more of a hat approach and messed up the bend from the plait to the hat.  Third time was a charm though and if I do say so myself I reckon it looks pretty good.


I have realised that I am somehow a stitch behind in TAST they're up to stitch 89 already.  As I started from the list from the previous TAST round I've done some that aren't on the current TAST list and have always been a few 'ahead'.  But as I usually don't do the beaded version of a stitch  (because of my bead aversion haha)  I've gotten one behind - oh no!  As this round of TAST is only going up to 100 stitches I really want to finish with everyone else.  That and I may or may not have already picked out the chicken for number 100 haha.  

Anyway, so as well as whatever the new stitch is tomorrow, I'm also doing Italian Border stitch this week.  Link to the tutorial on Pintangle here.  I just have to hope now that Sharon doesn't pick that before we hit 100, otherwise I'll have to pick something else.  Italian border stitch is like Fly Stitch but instead of using a wee stitch to hold it down you use a French knot.  I've already managed to chicken-ify it so watch this space to see it in action.

Here's a picture of the stitch from Pintangle.


Saturday, July 1, 2017

TAST - Wrapped Coral

So this weeks stitch is Wrapped Coral.  Sometimes I look at the stitch for the week and I know exactly how to chicken-ify it.  And sometimes theres nothing.  This week is one of those, although I thought maybe an edging to a dress?  Sometimes once I start practicing the stitch another idea will appear.  But once I re-read the tutorial Sharon had suggested doing each stitch closely together so I squished them up a bit further and it gave quite a solid braided look.  So thats what I'm going with.  You'll have to wait and see the chicken-ifying, I'm not sure its going to work, but time will tell .😀

If you want to view the tutorial over at Pintangle the link is here.  Here's a photo of the stitch from Sharon's site.


Encrusted Calico

Lots of filling in mostly over the last few days.  I've added in two new stitches, some cast on stitch up the top amongst the French knots.  And I've covered one of the lower bumps with satin stitch.  

I also had a dig through my drawer where I keep all those spare buttons that you get with new clothes and found some nice bronze looking metal buttons that I think I'll incorporate, I've added one already and I'm liking it.  I have no idea what clothes the buttons have come from.  I found about 5 similar looking ones but all slightly different so they're obviously all from different items of clothing and not one of them looks familiar.  Goodness knows how long they must've been in the drawer!


Learning Number 7:
Make sure to draw your edge on the top fabric - It mind sound obvious but I drew mine on the back fabric when I was playing with the bumpy bits and bobs deciding where they'd go.  But it never occurred to me to then at least put a few marks on the top fabric as an approximate edge. I'm not going back to fix it though and it did help me decide that the piece won't have a 'hard' edge which if I'd gone with my original edge it would've had. 

Learning Number 4 (again)
Yep I didn't learn this one obviously.  I had a bit of a disaster and caught one of the woven wheels with my needle and it wasn't fixable this time.  After saying some colourful words that aren't suitable for polite society I tried to wriggle the threads to pull the catch back in but was totally unsuccessful.  So I pulled the whole thing out instead.  I was a bit unsure about it to start with to be honest.  I'd done a buttonhole type edging to start with and then done the woven wheel over the top and I just wasn't 100% happy with the way it looked, the two stitches were obviously still two stitches, rather than easing into each other as I'd hoped.  (Maybe more spokes would've helped with that?). I was hoping I'd like better once I started filling in around it.  Oh well the decision was made for me.  I'm much happier with the replacement needlelace filling.